


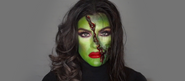
This Halloween season, we’re teaming up with talented makeup artists across the United States to bring you a series of exclusive SFX makeup tutorials. In our third release of the series, PRO artist Janet Cake creates the haunting face of The Nun from the horrifying feature film of the same name.
Follow along as Janet walks you through each step of creating the look!
Shop The Look

Ben Nye
Clown White Makeup
Starting at $6


These are the products she used:
- Ben Nye Clown White Makeup – 0.65oz, $6
-
Ben Nye Pressed Eye Shadow – Greystone, $12
- Graftobian Stipple Sponge – Single, $1
- Kryolan Tooth Enamel – Black, $12.40
- Camera Ready Gel Eye Liner – Black Out, $10.99
- Ben Nye Pressed Eye Shadow – Black, $12
- NYX Slim Eye Pencil – Black, $6
- RCMA No Color Powder – $14
- Mehron Face Paint Paradise Makeup AQ – Black, $13.95
- Mehron Face Paint Paradise Makeup AQ – White, $13.95
Total Cost: $102.29
Get the look for less! Purchase refill shades versus full-size product:
- Ben Nye Clown White Makeup – 0.65oz, $6
- Ben Nye Pressed Eye Shadow REFILL – Greystone, $9
- Ben Nye Tooth Color – Black, $9
- Camera Ready Gel Eye Liner – Black Out, $10.99
- La Femme Eye Shadow Pans Refill – Black , $7.90
- L.A. Girl Eyeliner Pencil – Black, $3
- RCMA No Color Powder – $14
- Mehron Paradise Cake Makeup REFILL – Black, $8.95
- Mehron Paradise Cake Makeup REFILL – White, $8.95
Total Cost: $77.79

Step 1: Cover eyebrows and face with white makeup paint.
Dip a foundation brush into Ben Nye’s Clown White Makeup and apply liberally over eyebrows until completely covered. Using a clean makeup sponge, dip back into the Clown White and apply a thick, even layer all over the face.

Step 2: Set makeup in place with setting powder.
Using a large powder puff, apply transparent setting powder all over your face to lock makeup in place. Gently press the powder into your face, as opposed to lightly tapping with the puff. Janet uses RCMA No Color Powder.
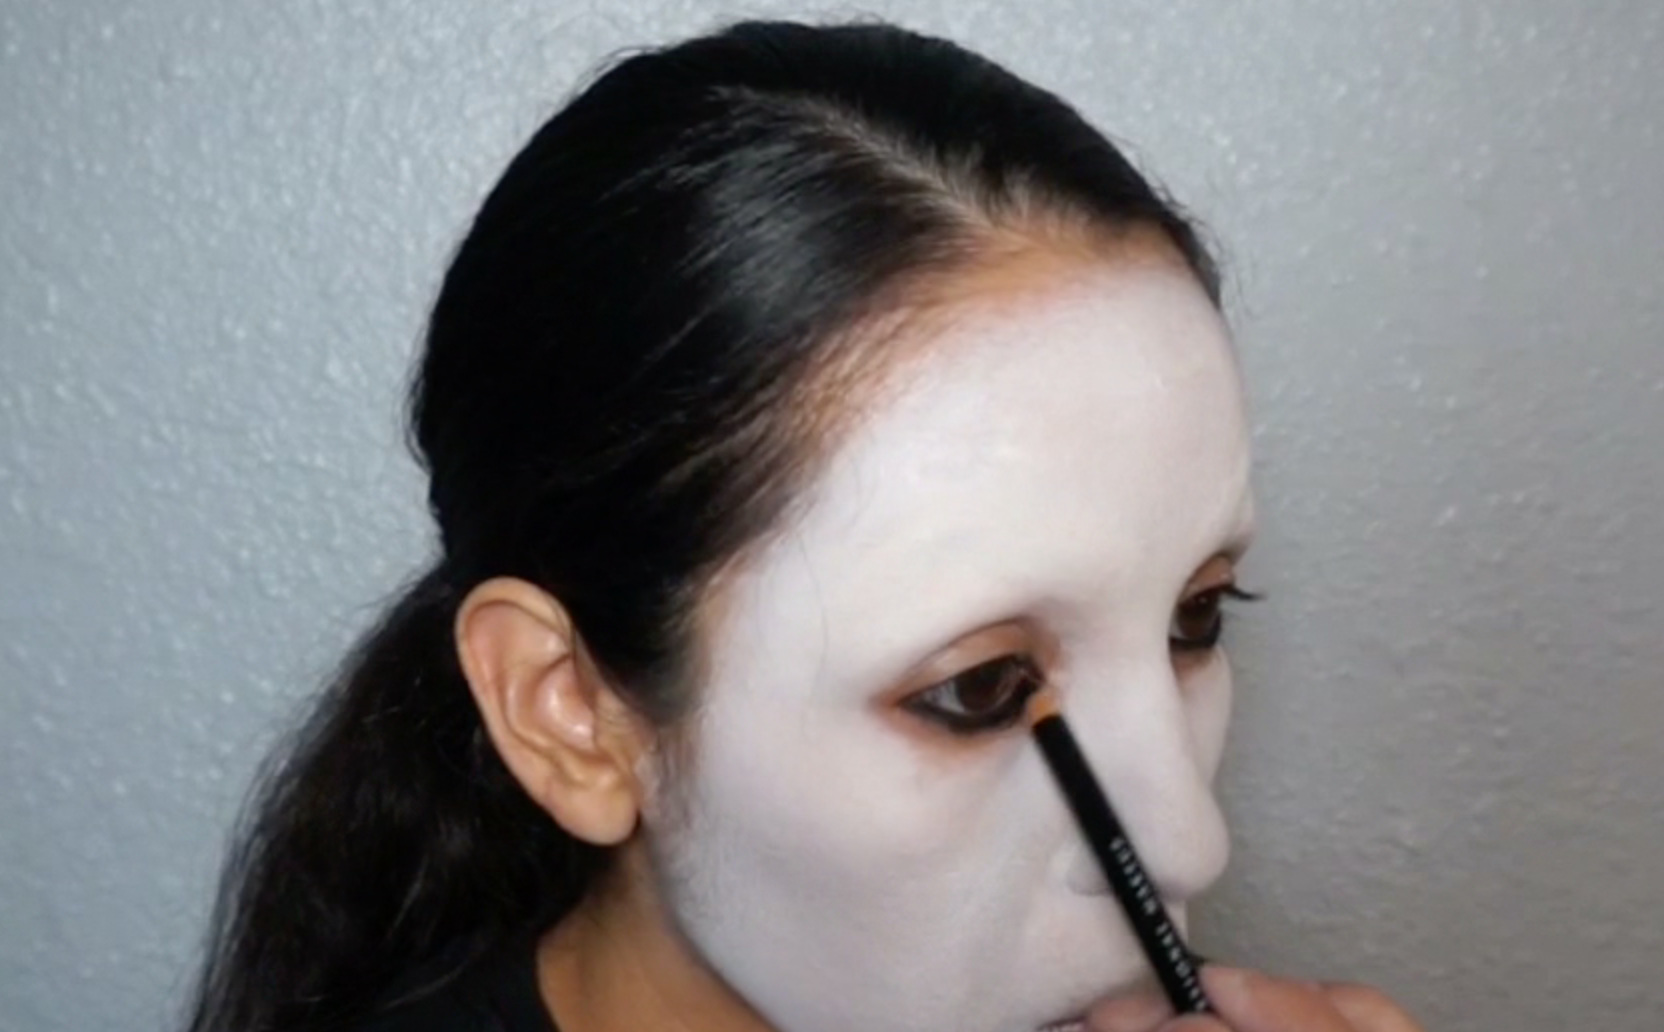
Step 3: Fill-in waterline with black eyeliner.
Use a black eyeliner pencil, fill-in the bottom lash line and inner corner of the eyes. There is no such thing as applying too much here. Go heavy and thick to start the foundation of a “sunken eye” look that you’ll finish creating in next steps.

Step 4: Cover full eyelid in black liner and smudge out.
Using a flat concealer brush, apply black gel eyeliner all over the lid and underneath the eye to enhance the lined under eye. Diffuse to the corner of the brow bone and under eye area with a fluffier brush. Both eyes don’t need to be the same; asymmetry is perfect for this look.

Step 5: Set black gel liner with black eyeshadow, and create shading.
Set the gel liner all over your eyes with a black eyeshadow, like Ben Nye's Pressed Eye Shadow in Black, and use a small smudge brush to create shadow-like details around eye area and brow bone.

Step 6: Contour nose with black eyeshadow.
Using that same smudge brush and black eyeshadow, begin to contour the nose to create a slimmer, bonier appearance. Shade in the nostril area create the look of a pointed, narrow tip.

Step 7: Apply black gel liner all over lips.
Apply black gel liner all over the lip, pressing them together to evenly distribute. Use that same concealer brush from earlier to create smudges and fine lines around the perimeter of the mouth. The messier the better, so don’t hold back!

Step 8: Create shade around cheekbones, jawline, temple and forehead.
Using a dark grey, matte eyeshadow, create shading along the cheekbones, under the jawline, around the temples and across the forehead. Once you’ve outlined your shading, go back over it with the black eyeshadow to deepen the color and create significant creases around the face. Again, the goal is to create an eerie, sunken appearance.

Step 9: Darken shaded areas even more.
Take your shading a step further! Lightly apply the black gel liner across those areas that were just shaded. You don’t need to fill in all the way, just lightly swipe the dark gel liner across, almost as if creating accent lines. Set the gel liner in place with black eyeshadow.

Step 10: Stipple black paint on top of dark areas; do the same with white paint on white areas.
Using Mehron Face Paint Paradise Makeup AQ in black and white, add more texture and depth to the face. Take a wet stippling sponge and dip into the black paint, applying lightly over the dark areas of the face. Repeat this process with white paint, creating highlight around the lighter areas of the face.

Step 11: Create veins!
Apply thin black lines around the face, smudging out with your finger. Start with the grey eyeshadow, creating small, thin lines all around the face. Go back over all lines with black eyeshadow for added definition.
Use your own discretion as to where you place these. This doesn’t have to be perfect! Small details make all the difference, and being messy with this techniques makes the final look even better.

Step 12: Create pointed teeth!
Create the appearance of sharp, pointed teeth using black Kryolan Tooth Enamel. Create a V-shape at the bottom of each tooth and fill in the bottom portion below the V. This looks like you’re teeth are thin daggers – creepy!!

Visit our YouTube channel for a step-by-step video tutorial of The Nun makeup look. A special thank you to Lei V Artist Agency and artist Janet Cake (@janetcakemua) for making this video possible.
Catch Part 1 & 2 of our Halloween video tutorials series here, featuring artist Kelly Tull creating a pop art comic book character and artist Andie Piazza creating a Bombalurina inspired look from CATS: The Musical.
We’re accepting your videos as part of CRC’s SFX tutorial series! Send submissions to [email protected] for consideration.
Need something specific to create your SFX Halloween looks? Shop Camera Ready’s extensive collection of top special effects brands here.
Don’t see what you’re looking for? Contact our Customer Experience Team for a comparable alternative, or to see if we can order the exact product you need.

Mallory Hatten
Beauty Editor / Camera Ready Cosmetics


Leave a comment