


Makeup & text by Jamie Fawn
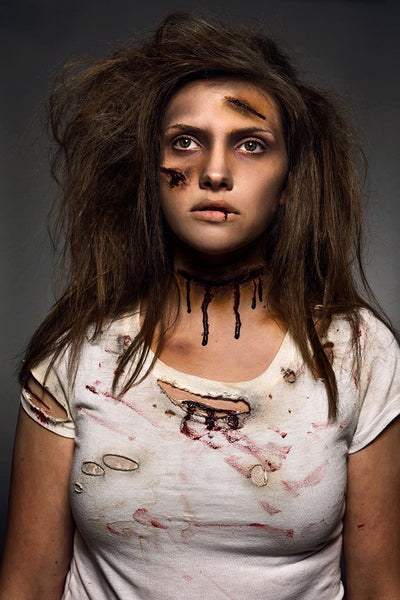
Whether you’re creating a makeup zombie face for a Halloween costume, SFX character look, or just for fun, this helpful guide is sure to come in handy as you work on all the details. From bruise makeup and knife wounds to fake blood and more, your realistic zombie makeup look is sure to spook! Read on to learn the five steps for how to do your own makeup for zombie look like a pro.
5 Steps for Creating a Zombie Face with Makeup:
Step 1: Clean, prep, and prime
Step 2: Apply base color, bruises, and sunken eyes
Step 3: Add wounds and blood
Step 4: Contour and add details
Step 5: Create dry, cracked lips
STEP 1
Makeup For Zombie Step 1: Clean, Prep, and Prime the Face

A fresh, clean, primed face is essential to creating a long-lasting zombie face makeup look. For cleansing, we like to use Bioderma Sensibio H2O, especially on set. Since it's rinse free, there's no need for water. This will clean and remove any makeup from the face and eyes. Simply soak a cotton round and wipe away makeup.

Next, apply a thin layer of Embryolisse Emulsion Hydra-Mat moisturizer and give it a few minutes to soak in completely. Then, using the Bdellium Tools’ Maestro 947 Small Foundation Brush, apply Mehron Skin Prep Pro to the face. Skin Prep Pro will help your zombie face last longer as it protects your work from heat and moisture, like sweat and humidity. Wait 5 minutes for this to dry before you apply your makeup for zombie.

Makeup for Zombie Step 2: Apply Base Color and Add Bruise Makeup and Sunken Eyes Effect

Some bruise makeup and sunken eyes on a pale base are just what you need to create that gruesome zombie face.
For foundation, use RCMA KJB Complexion Palette and mix a small amount of white with the lighter colors to make your zombie face look very pale. Apply it with the Bdellium Tools 948 Foundation Brush.
Add bruise makeup to the neck, collarbone, and eye areas to simulate the effects of having been attacked. To complete the look, add bruise makeup to the parts of the skin that are peeking out of the T-shirt. To create this bruise effect, use the Mehron Pro Color Ring - Bruise, focusing on the colors: Maize Yellow, Spanish Olive, Burnt Maroon, and Bloody Rose. You’ll also want to include the brightest purple from the Ben Nye FX Color Wheel.

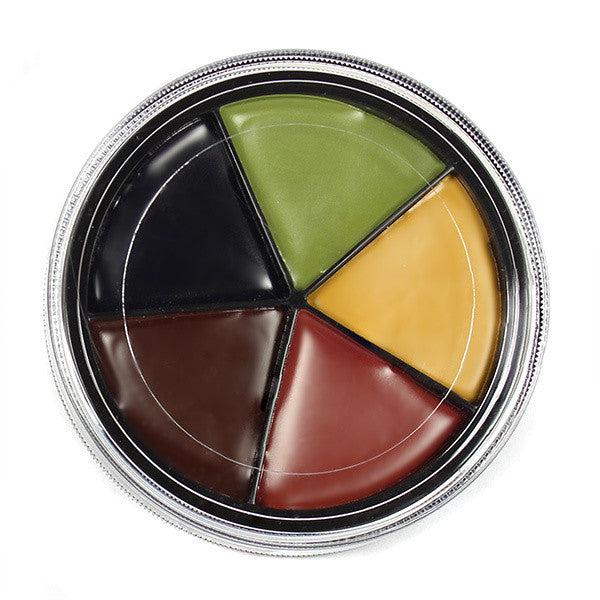

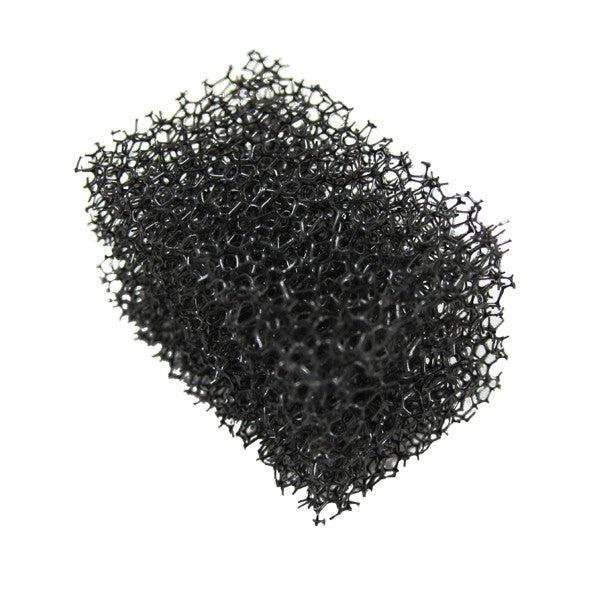
Apply the bruise makeup with a Graftobian Stipple Sponge for a more natural look, and blend out the edges with the Sigma E28 Detail Buffer Brush. When making makeup bruises, you'll want to determine the stage of injury your character is in and match the age of the bruise to it. In this makeup for zombie look, you will see the stages of bruise makeup coloring, beginning with a bright red fresh bruise to an older bruise with a more faded yellow.

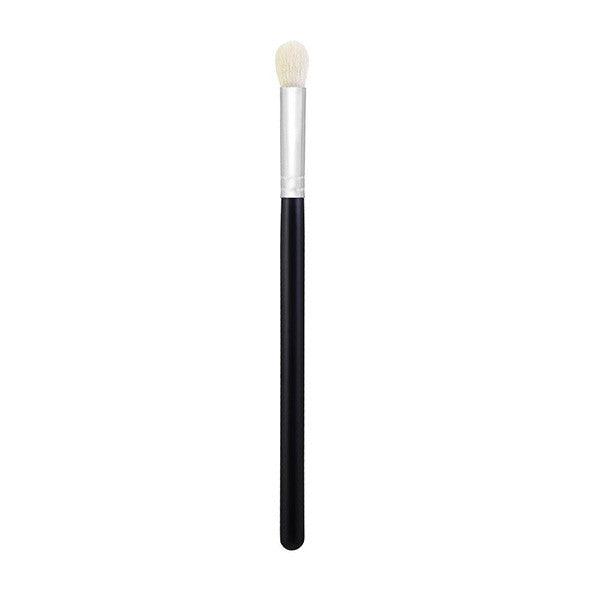
To create the sunken eyes, use the Ben Nye Professional FX Wheel in Death Pro Effects, specifically using the grey, brown, muted yellow, and green colors. Add the brown into the crease of the eye for a sunken look. Then, add greys for an aged, dehydrated look. Add greys, greens, and yellows underneath the eyes in a random pattern. Apply with the MYKITCO Shade and Shadow Brush.


Makeup for Zombie Step 3: Add Knife Wounds and Blood

Fake knife wounds and fake blood really up the terror ante and drive the SFX zombie makeup look home. To create knife wounds for your zombie face look, use 3rd Degree Silicone Modeling Compound in Light flesh tone.

It is extremely important not to cross-contaminate any modeling compound from jar A with jar B. This will cause the product to set and be unusable. Mix products on a separate surface. Try using the Graftobian metal palette and metal spatula.


Mix the two components with a 1:1 ratio creating enough product to make a small slash wound. You will have about 10 minutes to play with the product. After mixing, transfer the product directly onto the skin and create the desired shape of your fake cut for your zombie face. Use a cotton swab dipped into TEMPTU Pro Alcohol 99 to smooth out the edges so that it is seamless.


Once the product has set, use Skin Illustrator’s Zombie Palette and PPI’s Skin Illustrator Slow Activator. In the deepest parts of the fake wound, you will apply the Black from the Zombie Palette to add depth. Because this makeup for zombie look is slightly aged, we added the color Aged Blood along the rest of the inside of the wound and then around the edges with the Ben Nye FDB-6 Petite Filbert Brush.

Next, add Mehron Coagulated Blood Gel with a brush to the fake slash, allowing it to drip down for an oozing effect. We also used the Coagulated Blood Gel to smear on our zombie's shirt.

To give the larger or deeper wounds a more agitated look, add Ben Nye Thick Blood into the deepest areas of the neck, chest, and cheek wounds using a metal spatula to scoop out and place in wounds.

Makeup for Zombie Step 4: Add Details Around Knife Wounds and Add Contouring

Add contouring to the zombie face to give a more sunken appearance. To achieve this, use the grey and taupe-toned eye shadows from the Ben Nye Glam Palette at the hollow of the cheeks, the temples, the bridge of the nose, sockets of the eyes, and jaw line. Use the Bdellium Tools’ 556GT Slanted Precision Kabuki brush and 940GT Face Blending brush to contour the large and small areas of the face.


Add some purple under the eye from the Ben Nye Professional FX Wheel to create more makeup bruises. Next, add details around the fake wounds to give the effects of infection, puss, or bruising using the same color wheels to make the bruising. Apply the details using the Mehron Color Wheel with the Ben Nye Petite Filbert brush.

Makeup for Zombie Step 5: Add Drying Cracked Effects to the Lips
To finish the zombie face, add Ben Nye’s Grime FX Powder in Ash to the lips for a dehydrated cracked look, using the Cozzette Infinite Power Blending Brush.
Complete your makeup for zombie look by applying a fake scab to the lips with a small piece of the Ben Nye Thick Blood paste using a metal spatula.
With these simple steps, you can apply your makeup for zombie look like a pro. When you’ve finished your SFX makeup work, don’t forget to tag us on Instagram to show off your frightening character creation!
The Products We Used to Create This Makeup for Zombie Look:
Embryolisse Emulsion Hydra-Mat
Bdellium Tools’ Maestro 947 Small Foundation Brush


Leave a comment